~ Dipped Candy Cane Sticks ~

What I used :
Chocolate Almond Bark
Bob's Canes
White Sprinkles
My trusty Meat Tenderizer - to break apart the blocks of the Almond Bark
Wax Paper (Not Pictured Above)
Glassine Treat Bags with Twist Ties (Not Pictured Above)
One of the freshly dipped canes resting on Wax Paper waiting for Sprinkles. I use my trusty Wax Paper or my SilPat for things that I don't want to stick and want to be able to easily remove. 

Some of the finished Dipped and Sprinkled Candy Canes. These are tasty all on their own, or use them as a stir stick in coffee for some added sweet flavors or use in hot cocoa - YUM! 

I placed one, two, or more canes into each Glassine Treat Bag and used Silver Twist Ties to close them up. The Bags can be found in different shapes and sizes in the cake or cookie decorating aisle in most stores.

 These are a quick and easy little treat to hand out to friends, family, neighbors, teachers, etc... 

~ Christmas Cupcakes ~

This vanilla cake recipe called for making a soft peak meringue for the batter. 
Getting ready to use my pink cupcake corer.

Filled the cupcake with a fresh cranberry lime salsa.

Replaced the "lid" then frosted it. 

A quick tip: Sometimes I set a cooling rack over a bowl when sprinkling cupcakes. It saves the extra sprinkles that didn't stick, thus saving money. 
The results.


Vanilla cupcake with an almond buttercream frosting, and a cranberry-lime salsa filling, topped with a candy peppermint. 

~ Some Fun Christmas Cookies I've Decorated in the Past ~

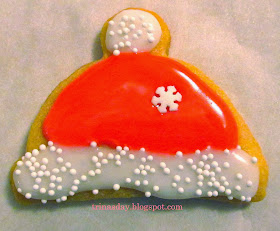
Fun Little Santa Hat

A Festive Group of Christmas Cookies

Love how my Mitten turned out!

These cuties were fun to do! 

The Santa went to my sweet Niece

I made a special Snowman for a special friend

~ Homemade Hot Cocoa Mix Gifts ~

Here is the Cast of Characters:
A Cute Container (One you can see through is better for presentation.)
Homemade Hot Cocoa Mix. (Or a store bought mix is fine.)
Mini Marshmallows
Candy Cane Mints
Ande's Mints Pieces (not pictured here)
Pretty Ribbon
Something to break up the candies with. (I used my heavy meat tenderizer.)
A heavy bag to hold the candies in while breaking them up. (A small freezer bag is what I used)
Note: You can use mini chocolate chips if you are not a lover of mint. 

Fill The Container
Start with the Hot Cocoa Mix. Spoon in enough to fill half of the container.
Then add the marshmallows. Add enough marshmallows to almost fill the other half, leaving room for the layers of mint toppings.
Lastly, add the Mints in layers.

The Finished Gift
I used chalkboard paint and painted the top of the can lid the day before.
I then wrote "Hot Cocoa Mix" and drew Christmas themed items on it with my chalkboard pen.
Tie a pretty ribbon around the middle.

I also tied a tag with instructions on to the handle. (not pictured here)
My instructions read: "Add 2 T. of Mix to one mug of hot water, add toppings, & enjoy."

I've had good reactions from the receivers of these gifts so far. I'm planning on making more. These are great low priced gifts for teachers, neighbors, etc… Also a nice "Secret Santa" or a $5.00 exchange gift. I'm going to have some hot cocoa right now! Yum!

Turkey Cookies for Thanksgiving

My Mom requested turkey cookies for Thanksgiving this year. Here's what I did:  
One of the cookie cutter shapes I used. 

 Cooled and ready to be decorated!

 
Working on this one… 

 My finished flock for all to enjoy after the big meal! 


'Tis The Season to be Jolly!

I had just used my vintage chalkboard for a baby shower this weekend, but today thought I would transform it for the Christmas season. 

I've had pretty good luck with the "Bistro Chalk Marker" that can be found at most craft stores. (If they are not sold out! - LOL) 

Snowflakes have always been one of my favorite things to draw, so this was a fun and quick project!

My Fun "Fireflies" Jack-O-Lantern

Starting the design - I put wax paper down to catch the pieces. It works better than newspaper. Newspaper can get damp from the pumpkin and become a mess. Wax paper makes clean up easy. 


"Fireflies" Jack-O-Lantern out on the step waiting for the trick or treaters. I rub petroleum jelly onto the carved and cut areas of our pumpkins so that they keep a lot longer. It gives them a bit of a shine also. 

In the dark ~ a glowing jar of fireflies.


My Son's "Electrical Mad Scientist" Themed Graduation Party

Our son is a bit of a "mad scientist" with electronics, so that was the theme for his High School Graduation Party. He is now in college for Electrical Engineering. 

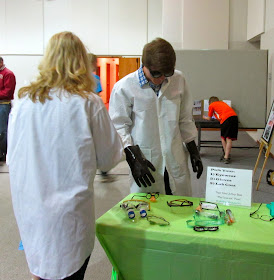
The Photo Booth Area: Lab coats hanging up and accessories on the table. 
The Dress Up Table: Glasses, Goggles, Gloves, and Props. A sign saying
 "Pick Your 1) Eyewear 2) Gloves 3) Lab Coat Then give us your best mad
scientist pose! MUAHAHAHAAA!" 
Getting Ready! 

My Son and his Girlfriend posing for the camera! 
A Plasma Globe for the Mad Scientists to pose with. 
My Son wrote on a chalkboard made by a friend. "Mad Scientist
Career Path", along with some formulas etc...It made a great backdrop for the photo booth. 
Scopes
Classmates as Mad Scientists. I had a friend be the photographer for the party. The next day we were able to share the photos with everyone that dressed up.

Family fun for all ages in the photo booth! 

My Son's Tesla Coil and Jacob's Ladders on display. (Not
working of course!) We had a video and slideshow
 playing of those items in action. 
The sign in: We chose many scrapbook pages and colorful pens. 
Friends checking out the Tesla coil and the video. 

Our son also made a photo light Theremin. It makes different pitched sounds when light is shined onto it. He had a mini science fair board with instructions on the table for kids to read and little flashlights for Them to use to make it work.  

One angle of the open house. I hung scrapbook pages on the divider walls. I called it the "exploded scrapbooks". People commented that it was easier to see more pages that way. 

One of the table centerpieces. I used a glass cylinder and filled it with various electronic parts that my husband had in his spare parts.I tucked small photos in the cylinder of our son doing his experiments also. Random bigger pieces were set around on the silver disc.


Gift and Card area. We used a hollowed out scope for the cards. We had a sign saying "Insert Card Here". A wire basket on the bottom shelf held most of the gifts below. 


At home opening the scope to reveal all his cards. He was so blessed! 


Our Son's Graduation Party - Let's start with the Cookies!


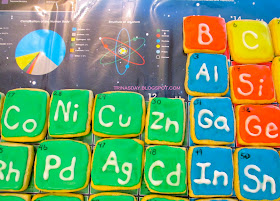
I decided to do the Periodic Table of the Elements for my son's graduation open house party. 

First, I ordered a poster of the Periodic Table online that was colorful. This one had many colors, some only have a few.

I cut the cookie dough into squares that would fit the squares on the poster. (I tried to find a square cookie cutter the size I needed but didn't have any luck and ran out of time to keep searching.) Each cookie is about 2" square - or as close as I could get free handing the cuts. :D

I tried to match the icing color as close as possible to each square on the poster. I piped the big letters with royal icing, but for the very small numbers in the corners I very gingerly used a food color pen.

I used a clear table cover over the poster, then placed the cookies onto it in their correct order when they were finished. It was a hit at the party. My son loved it and I think it turned out great for a first time effort!